Wednesday 22 August 2012

Watch this space!

I have been busy working on lots of new shoots recently so keep you eyes open for the photos!  Here are a few behind the scenes photos for you!


These were from our 'Trash the Dress' shoot with photographer Fallon Ismail (http://www.fallonismail.co.uk/) and model Hayley Evans.


These were from Fallon and I's Lip shoot where we wanted to focus on close up lips. Here are models Stephanie Fitzpatrick (http://www.modelmayhem.com/2296554), Katie Jane Garner and Antonia Anderson (in order) being made up by me!
 
So excited to see the finished results... watch this space! x

Gems Galore!

I worked with photographer Michelle Bridget in the spring again, and although our aim was to produce lots of new images with 7 models, only one turned up! ( the lovely Molly Wakeling) and so we had to go with it and improvise!

Thankfully I had bought my extended kit and so I dug out some gems which I have always wanted to play around with. Here are the finished results - not bad considering we had no planning!!


Tuesday 17 July 2012

Black, White and Beautiful

I have been busy working on lots of photoshoots and other work experience recently, and it has been a great opportunity to work with lots of other photographers, makeup artists, models and clothing designers. One of my favourite shoots has been with photographer Liam Cox from Reading and model Michelle Bridget from Hemel Hempstead. It took a while for us to organise this shoot but we finally settled on a local location in to Michelle and I in Kings Langley, where we have previously worked.

The theme of the shoot was to focus on black and white photography and makeup. I wanted to create real depth and emotion in the images by using highlighting, shading and contouring in the makeup, especially on the cheekbones, nose, jawline, brows and eye sockets. Here are some images which I fell in love with and was really inspired by:


I really love the raw emotion and feeling that comes through in these shots and this is what I hoped to recreate. I used darker tones on Michelles eyes and cheekbones in order to add definition and depth to the face, although I still think I could have done more. I also used a paler foundation in order to create a contrast betweeen the two. She looked quite strange in colour as her makeup was darker but I think it worked well in the black and white images. Liam shot her in black and white as well so they look much more effect than just changing the tone.  Here are the finished shots:


Sunday 15 July 2012

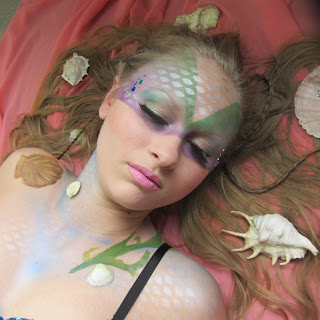
Seashells and Seaweed: Mermaid Airbrush

I really enjoyed airbrushing so I wanted to share with you another piece of work, this time incorporating body art as well. This design was centered around a sea creature/mermaid theme and was a fantasy focused design. I have always wanted to do a mermaid fantasy look because I think it is a great way to experiment but also incorporate beauty and elegance. Here are some images that inspired me:


Once I had decided on my theme I again visited the WRAP recycling centre and got loads of amazing fabrics and materials to use for a costume. The best item I found was a scale -like piece of metallic material which I knew instantly could be used to create my mermaid airbrushed scales.

I began by applying a light foundation base and powdering well. Then, using masking tape I marked out the shape on the face that I wanted to create. Masking tape is great in airbrushing as it can be used to create clear defined lines and shapes without harming your model or makeup. Once I had this I used two water based colours (green and lilac) and blended them into one another across the eyes (make sure that your airbrush is on a low pressure around the eye are as they are so sensitive). Once dried, I then used my scale fabric and a silver water based colour to create the scaly pattern on the face. I repeated these steps down the neck and across the shoulders. I then improvised and painted some seaweed and shells onto the model's body to add another dimension. Once I had this base I could then finish off the look with eyelashes, adornments, lipstick and some long plaits in the hair. I was really pleased with my final look and the costume finished it off brilliantly!


Wednesday 11 July 2012

Avant Garde Airbrushing

For my final project we had to create a full Avant Garde look including hair, makeup, costume and accessories, using body art and the airbrush. Avant Garde is so creative and varied and it allows you to really experiment and go wild with makeup. To get an idea, here are some avant garde images, most of which from the IMATS student competitions:


I decided to create an Avant Garde look with 'Tribal Beauty' as the theme. I wanted to be able to use the airbrush to compliment the theme and use colours, textures and materials to emphasise it.

I went to a volunteer recycling centre in Watford called 'Wrap' which was excellent as there were so many materials and amazing bits and peices in there which gave me ideas and inspiration for my costume and look, and most of my costume was made out of the materials I got there.

After prepping my lovely model and friend Sacha, :) I created the base with normal liquid foundation and added fierce features such as harsh black solid eyebrows and bright red blusher. I wanted this to be rough looking in order to be in keeping with the tribal theme. Then I used doilies and the airbrush machine to create an intricate pattern on the face and body, blending red and brown to add more depth. This worked surprisingly well and really accentuated the theme. I then completed the look by crimping and backcombing Sacha's hair and adding adornments to the face. Once costumed up we were ready to go and here are the finished results:


Tuesday 10 July 2012

Airbrush Effects

I wanted to get stuck in with one of my favourite modules on the course - airbrushing! This was such a fun way to apply makeup and allows for such a variety of effects, techniques, uses and creativity that I was very excited! The airbrush gives your makeup a much finer, flawless, natural look and is so quick, easy and hygenic to use. It is supposed to be ideal for bridal makeup but can also be used for photoshoots, television, film or bodypainting. Once you get the hang of the motion of the airbrush and the correct pressure you are away and can get really creative with colour, stencils, colour mixing and detailed designs.

 I have attached some of my work created with the airbrush to show the various techniques used at college but I have some more exciting and in depth ones to follow!